How to Winterize a Sprinkler System: The Blow-Out, Step by Step
Water left in a poly line does not care how mild the forecast looks in October
Top Picks (At a Glance)
Quick links to the products we recommend most in this guide. Prices shown on Amazon at click-through.

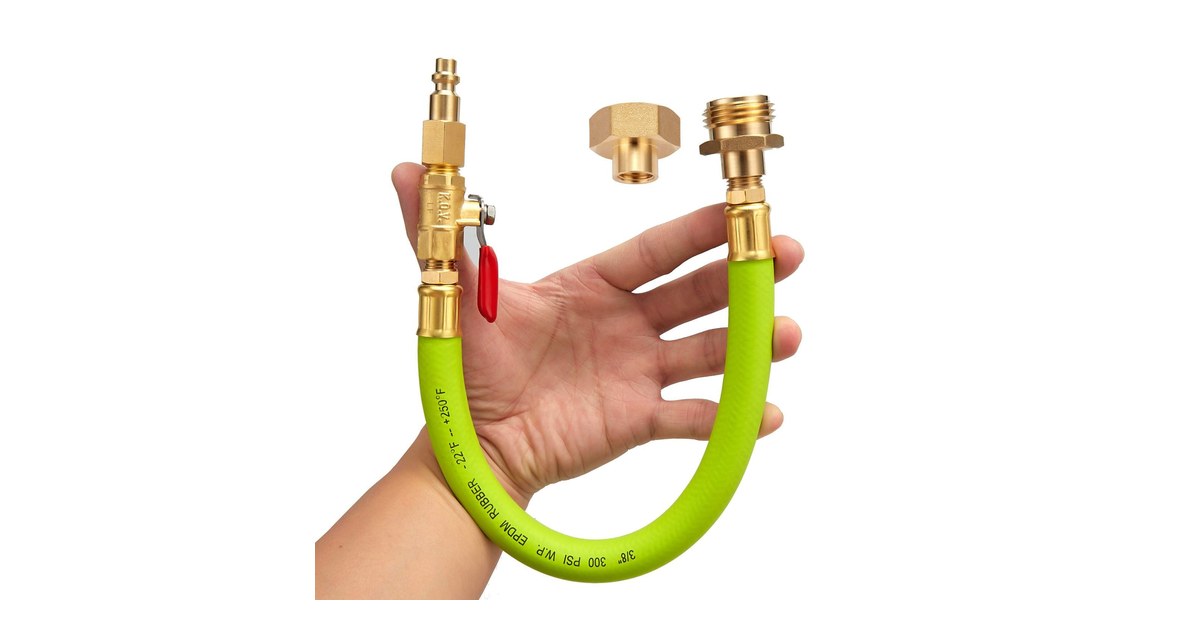
Minimprover Lead-Free Brass Blowout Adapter
Brass quick-connect adapter with EPDM hose rated to 300 PSI, certified under 0.25% lead - the fitting that joins compressor to system.
Check Price on Amazon →
Bostitch 6-Gallon 150 PSI Air Compressor Kit
A homeowner pancake compressor - run Hunter's CFM formula for your largest zone first; if it exceeds what this delivers, rent instead.
Check Price on Amazon →
Hometopia Insulated Outdoor Faucet Covers, 4-Pack
Slip-on covers for hose bibs and spigots - the five-minute step people skip right before the hard freeze.
Check Price on Amazon →Of the three fall winterizing jobs, this is the one with actual consequences. A mower left un-winterized costs you a carburetor cleaning in the spring. An irrigation system left full of water costs you trenching, because the splits happen underground at the fittings and you do not find them until May when zone three turns your lawn into a swamp.
First: Which Method Does Your System Need?
Manual or automatic drain systems have valves at the low points; you open them (or they open themselves below a set pressure) and gravity does the work. Blow-out systems - the majority in freeze country - require compressed air to push water out of lines that do not fully self-drain. If you do not know which you have, or your system was installed before you bought the house, find the manufacturer's documentation before you connect anything. Backflow preventers in particular have their own draining procedure and are the most expensive part to crack.
The Gear
You need three things. First, a compressor with enough airflow. Hunter's published sizing formula is the total GPM of your largest zone divided by 7.5 - that is the CFM you need at the point of connection. Run that number before you buy or borrow anything: it decides whether a homeowner compressor like the Bostitch 6-gallon can handle your system or whether the honest answer is renting a larger unit for the afternoon, which Hunter notes is how these compressors are commonly obtained. What does not work, per Hunter, is a small compressor with a fully charged tank used as a substitute for airflow. Second, a blow-out adapter to connect compressor hose to your system's port: the brass ones are worth the few extra dollars over plastic, and the Minimprover fitting is lead-free certified with an EPDM hose rated well above any pressure you should be using. And faucet covers for the hose bibs once you are done.
If your zone math lands within what a portable compressor delivers and you are buying one anyway, it is the least seasonal tool on this list - our air compressor guide covers the range, and the same tank runs impact tools, tires, and blow-gun cleanup all year. If the math says rent, rent.
The Procedure
Work in this order:
1. Shut off the water supply to the irrigation system at the main valve, usually in a basement, crawlspace, or valve box.
2. Turn off the controller - or set it to the "rain" or off position so it does not try to run a cycle in January. Some controllers keep programming in memory through winter, which saves you re-entering everything in spring.
3. Remove any flow sensor and seal the pipe - Hunter warns blow-out air can damage them - then connect the compressor to the blow-out port downstream of the backflow device, compressor valve closed and regulator set below your limit. Air must never be blown through the backflow preventer or a pump.
4. Open one zone - the furthest or highest one is the usual starting point - before introducing air. Never pressurize a closed system.
5. Run air through that zone until the heads spit mist instead of water, then stop. Two or three short cycles per zone beat one long one; continuous air with no water moving through builds heat and can damage heads and gears.
6. Repeat zone by zone, one at a time, until every zone has run dry.
7. Release the pressure, disconnect, then drain the backflow preventer separately per its own instructions - Hunter's guidance for a pressure vacuum breaker is to work the isolation valves open and closed several times, leave them about half open, and open the test cocks. Leave everything in the position your manufacturer specifies for winter.
8. Cover the spigots and disconnect every garden hose from the house - a hose left attached traps water against the bib and is the single most common frozen-pipe cause on an otherwise fine house.
While You Are Out There
This is the same weekend as the rest of the list: the mower, the pressure washer, stabilizer in whatever holds gas, and heat tape on the pipes that stay full. Doing all four in one afternoon in October is the difference between a spring that starts smoothly and one that starts with repairs.
Common Questions
When should I winterize my sprinkler system?
Before the first hard freeze - which means scheduling it in the fall while the weather is still merely cool, not waiting for the forecast that prompts everyone else to call the same irrigation company on the same day.
What size air compressor do I need to blow out sprinklers?
Size by airflow, not tank size. Hunter's formula is the largest zone's GPM divided by 7.5, giving the CFM required at the connection point. Compare that to your compressor's rated continuous delivery; if it falls short, rent a larger unit rather than trying to make up the difference with stored tank pressure, which Hunter specifically warns against.
Can I skip the blow-out if I just drain it?
Only if your system was designed to drain - some are. On a system that needs a blow-out, draining leaves water in low spots and lateral lines, which is exactly where the splits happen.
What happens if you do not winterize sprinklers?
Water expands as it freezes and splits whatever contains it: heads, valves, backflow assemblies, and buried lateral lines. The damage is usually invisible until spring startup, and the underground repairs are the expensive ones.
Sources
Ready to buy?
Browse current pricing, current models, and reader reviews on Amazon — your clicks keep these guides free.
Shop Winterizing Gear on Amazon →